Things You'll Need:
This project requires at least a little knowledge of Linux and the Raspberry Pi. You don't need to know any programming unless you
want to make any changes to the app. It is open-source and on Github.
Hardware needed:
- Raspberry Pi 3 or 2 (2 is better for power consumption)
- Micro SD card for Raspberry Pi - at least 8GB - class 10 speed or higher
- 5 inch touchscreen
- Amplifier (small, cheap ones found on Amazon
- USB GPS reciever
- Digital radio reciever (RTL-SDR chip - RTL2832U or R820T)
- USB thumb drive (whatever size you need for your media)
- Car computer link - ScanTool OBDLink must be USB!
- 4 port USB hub to handle all the devices and to spread things out
- WIFI dongle - not really needed, but nice
- Bluetooth dongle if not using at Raspberry Pi 3 - get the newest version you can, 4.0+
- Car cigarette lighter USB adapter with 2 ports - converts power from the car - I got 4.8A total, you might want more if you can find it
- USB extension so you can have a port on the front of the stereo
- Short HDMI cable
- Short USB cable to connect Pi to Car lighter adapter
- Materials to build the frame and front face
- Wiring harness for Pi stereo to connect to the car's stereo harness
- Extra wire for connecting amplifier
- Soldering iron and solder
- Tools for cutting materials - saw for wood, dremmel for plastic, drill + bits
Setup Raspberry Pi with Raspbian Buster:
First you'll need to download a Raspbian (now called Raspberry Pi OS) image from
RaspberryPi.org. The version I'm using and these instructions are designed for is
"2020-05-27-raspios-buster". Download the one that comes with "Desktop" software because we will be using X.org and some GUI apps. We will be
un-installing some of those apps later. After the image is downloaded, install it on a SD card using a image writer. If you don't know how to do that,
click here for more info or search Google for instructions. Once
the image is copied to the SD card, put it in the Raspberry Pi, plug in a monitor/screen, mouse, keyboard, USB WIFI and turn it on. It should boot up
and probably finish setting up and reboot again. When it's all done, make sure the WIFI is working. If it isn't working, do a Google search how to
install your model USB WIFI in Raspbian or Debian which is what Raspbian is based off of. It's best to configure the Raspberry Pi over the network
with another computer connected to a normal screen like a desktop or laptop. It's just much easier. A wired connection is good too.
If the Raspberry Pi is connected to the network, we can turn on SSH and VNC so you can use the Raspberry Pi remotely on another computer on the network.
You can turn on SSH and VNC by opening Raspberry Pi Configuration in GUI or run "sudo raspi-config" in a terminal. If using the GUI, the options to turn
on VNC and SSH are under "Interfaces". If using the terminal version, the options are under "Interfacing Options". If your going to use VNC, you need
a VNC client on the other computer to connect to your Raspberry Pi. I'm not going to explain how to connect to the Raspberry Pi with SSH or VNC because
it can be different each operating system. Just do a Google search on how to connect to a Raspberry Pi with VNC or SSH and plenty of tutorials will show
up.
While your in the configuration app, you need set the audio output to the headphone jack. In the Terminal version, it's under "Advanced Options",
then "Audio". I can't remember how to do it in the GUI, but it can probably be done with "Audio Device Settings" in the same "Preferences" menu you find in
the "Raspberry Pi Configuration". Also we should turn the volume all the way up. For GUI, click on the speaker icon and drag the volume up. For terminal
version, type "alsamixer" and move the volume up with the up arrow key.
This is not a bad time to connect any bluetooth devices you might connect to your stereo while you drive. Bluetooth devices should be
able to connect to it like a bluetooth speaker without a password or any security, but it might help to set it up before the Raspberry Pi is turned into
a stereo, while it's easier to work with. I also think there is probably some bugs involving my bluetooth code, so you would be less likely to have
issues if your devices are already paired now.
Don't forget the default login and password are "pi" and "raspberry". You may need to use it at some point.
Setup Touchscreen:
You can skip this section and come back to it if your not going to set up the Raspberry Pi through the network with SSH or VNC and
want to use a large screen while setting up. If you do skip it for later, do it before changing the root partition to read-only to make things easier
for yourself.
There are different screens of different sizes out there for the Raspberry Pi. You should follow the instructions that came with the
screen. This project was made with a Waveshare 5 inch touch screen that connects to the Raspberry Pi through the GPIO for touch input. The video is
connected through HDMI. Some screens connect the touch input through USB instead of the GPIO which is better because we want the screen to be apart
from the Raspberry Pi. If you have a GPIO version, you will probably need to make extension wires (not hard) so you can have more freedom to place
things where you want, unless you can find a way to position the screen/Pi combo and make it fit.
After you have the screen installed and working, you should disable Right-Click Emulation if it's on. This seems to cause problems
with the Scantool app. For some reason it wont register screen taps as mouse clicks in that app alone. The mouse cursor moves to the location tapped,
but nothing happens. So to fix this, just comment a few lines in the correct file and it will work on the next boot. To open the file, type:
"sudo nano /usr/share/X11/xorg.conf.d/99-calibration.conf". If the file is blank, then it's ok and you can quit by pressing CTRL-X. If there is something
there, then look for 'Option "EmulateThirdButton" "1"' and put a "#" in front of it. This disables that line by turning it into a comment, which is
ignored. Or you can simply change the "1" to a "0" instead. If you are still having problems with clicks in the scantool app and only that app, then
keep looking in other files in the same directory (/usr/share/X11/xorg.conf.d/) that might have input settings in them and look for the "EmulateThirdButton"
option and turn it off.
If you haven't bought one yet, get a screen with USB touch input, not GPIO because it's harder to deal with. If you are going to use
a screen that connects to the Raspberry Pi through the GPIO, you can make an extension wire for the GPIO with jumper wires, AKA Dupont wires or
breadboard wires. Get wires with a MALE connector on one side and FEMALE on the other and make sure they are long enough. It's just a matter of
connecting pin 1 on the Raspberry Pi to pin 1 on the screen, pin 2 on the Raspberry Pi and pin 2 on the screen, etc, etc. You only need to connect these
pins (GREEN) to get the screen up and running:
| PIN NO. |
SYMBOL |
DESCRIPTION
|
| 1, 17 |
3.3V |
Power positive (3.3V power input)
|
| 2, 4 |
5V |
Power positive (5V power input)
|
| 3, 5, 7, 8, 10, 11, 12, 13, 15, 16, 18, 24 |
NC |
Not Connected. Ignore
|
| 6, 9, 14, 20, 25 |
GND |
Ground (just one is needed, pin 25 works fine)
|
| 19 |
TP_SI |
SPI data input of Touch Panel
|
| 21 |
TP_SO |
SPI data output of Touch Panel
|
| 22 |
TP_IRQ |
Touch Panel interrupt, low level while the Touch Panel detects touching
|
| 23 |
TP_SCK |
SPI clock of Touch Panel
|
| 26 |
TP_CS |
Touch Panel chip selection, low active
|
Speed Up SD Card Reader / Turn Off WIFI (Model 3 Only):
The SD card reader on the Raspberry Pi can be sped up to double its default speed, but there is a reason its set to a slow speed. You
need a "Class 10" or faster SD card to turn up the speed. If you do you have a "Class 10" or faster SD card, you can simply edit the config file located
at /boot/config.txt and add the line "dtparam=sd_overclock=100" to the end of the file. You will need to be superuser (root) to edit that file. To open
the file as superuser, just open a terminal and type "sudo nano /boot/config.txt" and nano will appear. Add the line to the bottom of the file and save
by pressing "CTRL+O", press "Y", then press "CTRL+X" to quit.
If you have the Raspberry Pi 3 with built-in WIFI, you will want to disable it. You should have a USB WIFI installed instead. This is
because the built-in WIFI shares a radio with bluetooth and they can conflict when working at the same time, also the WIFI seems to die quick. You can
disable it by editing the config file again. Open it again with "sudo nano /boot/config.txt" and add at the bottom "dtoverlay=disable-wifi" and save
by pressing "CTRL+O", press "Y", then press "CTRL+X" to quit.
Install Apps Needed for Stereo:
You're going to need a few apps installed to be able to use all the USB devices plugged into this thing. As long as there is an
internet connection, you can use apt to install almost all of it. Type: "sudo apt-get update" to update apt and then type: "sudo apt-get install
navit rtl-sdr scantool gpsd gpsd-clients ntp default-jdk unclutter espeak". The last two are not necessary, unclutter is for hiding the mouse cursor
which will be hidden later when starting X up. Espeak is a text-to-speach engine that can be setup to work with Navit, but I haven't looked into how
it's setup yet. It's up to you if you want to look into getting Espeak to work with Navit.
To use the scantool app, you need access to /dev/ttyUSB0. Type: "sudo usermod -a -G dialout pi"
to add "pi" to the list of users allowed access to it. Without this, scantool can't access the OBD2 reader and will crash.
There is one app that needs to be compiled and installed without apt's help. Redsea reads the RDS data from the digital radio
signals and turns into text. You have to download the source code and compile it. If you've never done that, it's easy and consists of typing five
things into a terminal. The instructions are at github.com/windytan/redsea. Follow
the installation instructions for Ubuntu which is also based off of Debian Linux.
Setup NTP to get time from GPS:
NTP and GPSD should already be installed so all we have to do it make a few changes to the configuration. Edit "/etc/default/gpsd"
so that it looks like this:
# Default settings for the gpsd init script and the hotplug wrapper.
# Start the gpsd daemon automatically at boot time
START_DAEMON="true"
# Use USB hotplugging to add new USB devices automatically to the daemon
USBAUTO="true"
# Devices gpsd should collect to at boot time.
# They need to be read/writeable, either by user gpsd or the group dialout.
DEVICES="/dev/ttyACM0"
# Other options you want to pass to gpsd
GPSD_OPTIONS="-n"
To get it to load properly on boot, type:
"sudo ln -s /lib/systemd/system/gpsd.service /etc/systemd/system/multi-user.target.wants/"
Next time the Raspberry Pi is booted, it should load GPSD. To check if it's working (after reboot) type: "gpsmon". You should
see a lot of info including coordinates, if not then it's not working properly. If it's not working, make sure the USB GPS is plugged in and type
"sudo service gpsd status" to see if the GPD service loaded at boot.
Last we need to make sure the GPS is accessed and a GPS lock is made to get the time from the satellite and set the NTP server's
time to the new time. Linux will get the time from the NTP server and set the system time to the new time. Edit the file "~/.bash_profile" which may
not exist yet, and add this line to the TOP of the file: "gpspipe -w -n 20 &". This will get a quick lock before the car stereo app starts.
Setup Navit Config File and Download Maps:
You should have installed Navit in the last step, so all we need to do is download some free maps for it and configure it. To
get the maps you can go to Navit Planet Extractor and select an area of the globe you'd like for your
map. You can switch between selecting and area and moving the map around by switching between "navigate" and "select" in the "Map Controls" section
to the right of the map. Once you have selected the area you want, just click "Get map!" and it will download. It should be moved to the "pi" user's
home folder (/home/pi) or a subfolder in that folder, because the root filesystem will be read-only but the home folder will be writable so you can
update it easily.
To configure Navit, you just need to edit one file by typing: "sudo nano /etc/navit/navit.xml". There should be a lot of stuff in
that file, find the following line in the file and change it to look like this:
<gui type="internal" enabled="yes" font_size="500" >
font_size was something like 250 which looked dumb so 500 it is
The next four lines are for zoom buttons, compass, and next turn window. Two of them were disabled and all four had different sizes and locations.
Change them to look like this:
<osd enabled="yes" type="compass" x="-120" y="20" w="100" h="100"/>
<osd enabled="yes" type="navigation_next_turn" x="20" y="20" w="100" h="100"/>
<osd enabled="yes" type="button" x="-120" y="-170" w="100" h="100" command="zoom_in()" src="zoom_in.png"/>
<osd enabled="yes" type="button" x="20" y="-170" w="100" h="100" command="zoom_out()" src="zoom_out.png"/>
This is the map part. There might already be something similar but not enabled, either edit it to look like the next few lines or copy and paste the
next three lines into the config file somewhere near the other map stuff.
<mapset enabled="yes">
<map type="binfile" enabled="yes" data="/home/pi/THEMAPFILENAME.bin" />
</mapset>
Change the filename in the "data" section to the filename of the map you downloaded. The map file should have a name starting with "osm_bbox" and
then some coordinates.
There is plenty more you can adjust in the navit config file. I recommend reading up on it at
Navit's wiki on the subject.
Download and Install RobotoCondensed-Regular Font:
The car stereo app uses a font called "RobotoCondensed-Regular". You can download it from
Google Fonts. The file is a ZIP file and contains more than the font we need. Make a folder
in "/usr/share/fonts/truetype/" called "roboto". So the folder path should look like "/usr/share/fonts/truetype/roboto". Then unzip the files into that
folder. You'll need to be superuser to create the folder and put files into it. Once that's done, the font is installed, done.
Setup Raspberry Pi as a Bluetooth Speaker:
To set up the Raspberry Pi as a bluetooth speaker, we will install "bluealsa" and change some config files. To start, open a terminal
and type "sudo apt-get update", wait for it to update and then type "sudo apt install bluealsa" and wait for it to finish. Now create a service for bluealsa
by typing "sudo nano /lib/systemd/system/bluealsa.service". Type in the following text, or make sure it matches below if text is already in the file:
[Unit]
Description=BluezALSA proxy
Requires=bluetooth.service
After=bluetooth.service
[Service]
Type=simple
User=root
ExecStart=/usr/bin/bluealsa -p a2dp-source -p a2dp-sink
Next, add the "pi" user to the bluetooth group by typing "sudo adduser pi bluetooth". Now we need to edit the bluetooth service file
to stop from loading the SIM profile. Open a terminal and type "sudo nano /lib/systemd/system/bluetooth.service". Find the line that starts with
"ExecStart=..." and add to the end " --noplugin=sap". The whole line should look like this "ExecStart=/usr/lib/bluetooth/bluetoothd --noplugin=sap".
Next, we need to make one last file to get aplay to start with bluealsa as a service. Open a terminal and type "sudo nano /etc/systemd/system/aplay.service"
fill it in with this:
[Unit]
Description=BlueALSA aplay service
After=bluetooth.service
Requires=bluetooth.service
#After=bluealsa.service
#Requires=bluealsa.service
[Service]
Type=idle
User=pi
ExecStart=/usr/bin/bluealsa-aplay 00:00:00:00:00:00
[Install]
WantedBy=multi-user.target
That should be it. Try rebooting and test it out by connecting to the Raspberry Pi with a bluetooth device like a phone orby typing
"sudo systemctl status blue*". That should bring up the status of bluetooth service and bluealsa service. The Raspberry Pi should accept any incoming
connection from bluetooth devices looking for a speaker now.
Change Splash Screen and Boot Options:
You can change several boot options easily just by editing the correct config file. Open a terminal and type "sudo nano /boot/config.txt"
and add to the end "disable_splash=1", this will get rid of the "rainbow" screen when you first power on the Raspberry Pi. Now lets edit another file
"sudo nano /boot/cmdline.txt" and this to the end of the first line (should be one long line) "logo.nologo quiet splash". Now look in the same line of
text for "console=tty1" and change it to "console=tty3" and also look for "consoleblank=1" and change it to "consoleblank=0". That should turn off the
Raspberry Pi logos on the top of the screen when it first boots up, make sure the splash screen is shown, turn of console blanking (screen turns off),
and move the console from tty1 to tty2 which hides the text as the Raspberry Pi boots before X starts. Now we just need to change the splash screen
image. The image id found at "/usr/share/plymouth/themes/pix/splash.png" and is just a regular PNG image that is 800x480 in size. You can make your own
and replace it or download mine which is just a white Raspberry Pi
logo on black, it matches the rest of the GUI. Whatever you use just copy over "/usr/share/plymouth/themes/pix/splash.png" with it and you will need to
be superuser to do it. One last thing to ensure the screen does not turn off, open a terminal and type "sudo nano /usr/share/X11/xorg.conf.d/99-monitor-blanking.conf".
Fill in the file with this:
Section "Monitor"
Identifier "LVDS0"
Option "DPMS" "false"
EndSection
Section "ServerFlags"
Option "StandbyTime" "0"
Option "SuspendTime" "0"
Option "OffTime" "0"
Option "BlankTime" "0"
EndSection
Section "ServerLayout"
Identifier "ServerLayout0"
EndSection
Section "Extensions"
Option "DPMS" "Disable"
EndSection
That's everything for the boot process except for starting the stereo app and X, which is next.
Setup Raspberry Pi to Run Stereo App on Boot:
The car stereo app is a java app that requires X to run, but we don't want the entire GUI system to run, just X and the car stereo app,
so you need to turn off the the Desktop Autologin in raspi-config. To do that, open a terminal and type "sudo raspi-config". Go to "Boot Options" and
then select the "Console Autologin" and then, press "OK" and then "Finish". It should ask you if you want to reboot, so go ahead and reboot. Now is a
good time to get the car stereo app itself. Download the JAR file
from it's GitHub site and copy it to the home folder (/home/pi/). Next you need to edit a couple of config files to start X up and then our car
stereo app: .bash_profile and .xinitrc in the home folder. The first one we'll create by typing in a terminal "nano ~/.bash_profile". Add this line
"startx -- -nocursor -logfile /tmp/Xlog.log", save and exit. Next, type "nano ~/.xinitrc" and these lines:
@xset s noblank
@xset s off
@xset dpms 0 0 0
@xset -dpms
java -jar /home/pi/CarStereo.jar
The first four lines are to make sure the screen does not shut off. It's surprising how hard it is to keep it on. There seems to be
several apps that want to turn it off after ten minutes or a minute or whatever. It might be redundant a little, but it works. The last line is the
one that starts the CarStereo.jar app.
Move Home Folder to USB Partition:
The filesystem is going to be read-only, but you're going to want to save stereo settings or add MP3s to your Raspberry Pi later. So
lets take the USB drive that will hold your media, and make sure it is empty of any files. The USB drive needs to be mounted at boot so the home folder
is accessible. To set that up, we need to know what filesystem it is. Plug in the USB drive into the Raspberry Pi and type in a terminal "df -h". This
will show all the partitions mounted. Look for one the size of your USB drive and make a note of the filesystem (/dev/sd**). Then, get the UUID of the
USB drive by typing in a terminal "blkid". The line you're looking for is similar to '/dev/sd**: UUID="**************" TYPE="vfat"'. The UUID will be
different for each drive, some are longer or shorter. Make a note of that UUID number, for later. Now type in a terminal "sudo nano /etc/fstab". This
is the config file to automount filesystems. Add to the end of the file "UUID=???????? /media/home vfat defaults 0 2 ".
Replace the UUID with the number you took note of earlier. If your USB drive is not formatted to vfat (FAT16 or FAT32), then replace "vfat" with the
appropriate type. Now it will be mounted when booting, but not as a home folder yet. When we know it mounts OK in /media/home, then we'll move it to
/home. To do that, type in a terminal "sudo mkdir /media/home" to make the /media/home folder. Now reboot the Raspberry Pi and it should mount the USB
drive to /media/home. Type in a terminal "df -h" to see if it's mounted and at /media/home. If it is, then we can move it to just /home.
Before you move the mount point from /media/home to just /home, you need to copy the contents of the home folder to the USB drive.
Type in a terminal "sudo rsync -aXS --exclude='/*/.gvfs' /home/. /media/home/." to copy the contents from /home/ to /media/home/ (the USB drive). Once
that is complete, check it by typing 'sudo diff -r /home /media/home -x ".gvfs/*" '.
If everything has gone well, you can finally move the mount point. In a terminal type "sudo nano /etc/fstab" and change /media/home to
/home in the line you typed earlier at the bottom. And to move the old /home folder out of the way type in a terminal
"cd / && sudo mv /home /old_home && sudo mkdir /home". Now when you reboot, the home folder will be the USB drive. This means you need to always have
that drive plugged in or you will have serious problems. If the Raspberry Pi is frozen on the splash screen during boot, it may be having trouble
reading the USB drive or its not configured properly. That's it for that. You can leave the /old_home folder as a copy just in case you need it for
a recovery effort.
Change Root Partition to Read-Only:
When you turn your car off, the stereo will turn off also, without shutting down properly. Shutting down a computer like that is bad,
because you might corrupt a file that is being written to when it gets shut off. This isn't too bad on a normal desktop or laptop or even cell phones
and tablets because they have much better storage that can fix problems from turning off improperly. The Raspberry Pi uses an SD card which are great
for storing a lot in a small space, but that really don't like improper shutdowns. They can get completely corrupted or simply destroyed if you turn it
off wrong. So you have to go through the shutdown process every time you use a Raspberry Pi or make the filesystem read-only so it's never writing to
the SD card. In the last step, you moved the home folder to the USB drive, which is writable and will be where you put your media and settings get saved.
Before you make the filesystem read-only, you need to stop some logs from being written to the SD card or have them write to a
tempfs partition. Some other config files need to be moved or edited because they need to be writable for some services to run. After that, it's just
a matter of editing a couple more files and a reboot.
First you might want to make a backup of the SD card before doing this, because it might go wrong and you can start over easy with a
backup. When your backup is made, then you can remove a few apps we don't need by typing in a terminal "sudo apt-get remove --purge triggerhappy
logrotate dphys-swapfile". Then type "sudo apt-get autoremove" to get rid of any unwanted packages taking up space. Now type "sudo nano /boot/cmdline.txt"
and add this the end of the line " fastboot noswap ro". If there is two lines, put it at the end of the last line, it's really one line word wrapped.
Lets replace the log manager with one that doesn't write to the SD card. Type in a terminal "sudo apt-get install busybox-syslogd" and when that's all
done, type "sudo apt-get remove --purge rsyslog" to completely remove the old log system. You can use the "logread" command to check your logs now.
Now we're going to edit the "fstab" file to make the filesystem load in read-only mode. Type in a terminal "sudo nano /etc/fstab" and edit the file so
that it looks something like below. You're adding "ro" to the lines that start with "PARTUUID" (2nd and 3rd lines) and are adding the last three lines. It
should look something like this when done:
proc /proc proc defaults 0 0
PARTUUID=fb0d460e-01 /boot vfat defaults,ro 0 2
PARTUUID=fb0d460e-02 / ext4 defaults,noatime,ro 0 1
tmpfs /tmp tmpfs nosuid,nodev 0 0
tmpfs /var/log tmpfs nosuid,nodev 0 0
tmpfs /var/tmp tmpfs nosuid,nodev 0 0
Now type the following lines in a terminal, one by one, to set symlinks of files that need to be written to:
sudo rm -rf /var/lib/dhcp /var/lib/dhcpcd5 /var/spool /etc/resolv.conf
sudo ln -s /tmp /var/lib/dhcp
sudo ln -s /tmp /var/lib/dhcpcd5
sudo ln -s /tmp /var/spool
sudo touch /tmp/dhcpcd.resolv.conf
sudo ln -s /tmp/dhcpcd.resolv.conf /etc/resolv.conf
Type the following in a terminal to remove the systemd random seed "sudo rm /var/lib/systemd/random-seed" and type
"sudo ln -s /tmp/random-seed /var/lib/systemd/random-seed" to make a symlink from the old file you just deleted to where the new file will be. Now we
need to edit the service config file for random seed by typing "sudo nano /lib/systemd/system/systemd-random-seed.service". Add the line
"ExecStartPre=/bin/echo "" >/tmp/random-seed" in the [Service] section just before the line that starts with "ExecStart...".
There are some services that will cause problems because the filesystem will be read-only which are not needed so we can remove them.
Type in a terminal one by one:
sudo systemctl disable apt-daily.service
sudo systemctl disable apt-daily.timer
sudo systemctl disable apt-daily-upgrade.timer
sudo systemctl disable apt-daily-upgrade.service
sudo systemctl disable avahi-daemon
Next we'll edit the "journald" config file by typing in a terminal "sudo nano /etc/systemd/journald.conf" and the line that starts with
"#Storage..." and change it so it's "Storage=none". Now we need to edit a few more service config files so that the /tmp folder has the right permissions
to allow writing. For some reason I couldn't find any other way to set /tmp as writable before a few services start up so make these changes:
In a terminal type "sudo nano /lib/systemd/system/bluetooth.service" and find the line starts with "ExecStart=..." and add the next two lines before it
PermissionsStartOnly=false
ExecStartPre=/bin/chmod +1777 /tmp
In a terminal type "sudo nano /lib/systemd/system/dhcpd.service" and find the line starts with "ExecStart=..." and add the next two lines before it
PermissionsStartOnly=false
ExecStartPre=/bin/chmod +1777 /tmp
In a terminal type "sudo nano /lib/systemd/system/wpa_supplicant.service" and find the line starts with "ExecStart=..." and add the next two lines before it
PermissionsStartOnly=false
ExecStartPre=/bin/chmod +1777 /tmp
That will make sure that the tmp folder is writable for those services. There's two final steps to make things easier for yourself later. Type in a terminal
"sudo nano /etc/bash.bashrc" and go down to the very end and add these lines of code:
set_bash_prompt() {
fs_mode=$(mount | sed -n -e "s/^\/dev\/.* on \/ .*(\(r[w|o]\).*/\1/p")
PS1='\[\033[01;32m\]\u@\h${fs_mode:+($fs_mode)}\[\033[00m\]:\[\033[01;34m\]\w\[\033[00m\]\$ '
}
alias ro='sudo mount -o remount,ro / ; sudo mount -o remount,ro /boot'
alias rw='sudo mount -o remount,rw / ; sudo mount -o remount,rw /boot'
PROMPT_COMMAND=set_bash_prompt
And the finally type "sudo nano /etc/bash.bash_logout" and add these lines at the bottom (file might be empty):
mount -o remount,ro /
mount -o remount,ro /boot
The last two steps you did added two new commands you can type at the terminal. Type "rw" and it will remount the filesystem as
writable and type "ro" and it will remount it as read-only. When you logout, it will also make sure it's mounted in read-only mode, if you decide to
SSH your new Car Stereo. You should be all done with the software side of the project now. You just need to copy media, assemble all the hardware
and start installing it in your car.
Copy Your Media Over:
This is the easiest part. Make a folder in the home folder called "Media" with an upper-case "M" by typing this in a terminal "mkdir ~/Media". Once that is
done, you can shut down the Raspberry Pi and unplug the USB drive from the Raspberry Pi and plug it into a computer or device with the media you want
and start copying files to the Media folder. It is a good idea to organize everything into folders to make it easy to navigate through the menus at a
red light. Delete any files that are not music or video. They will show up on the file list as music, but shouldn't cause any problems. Those will get
skipped over if "played". When you have everything copied, just plug it back in to the Raspberry Pi.
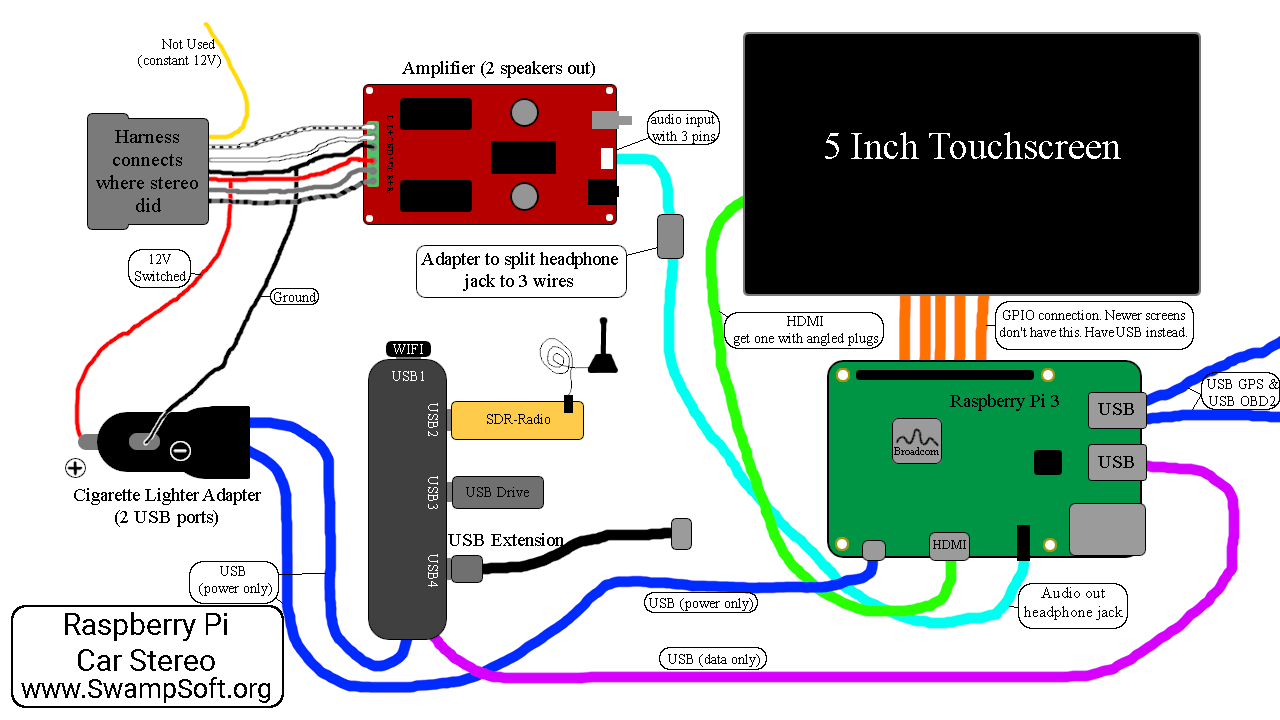
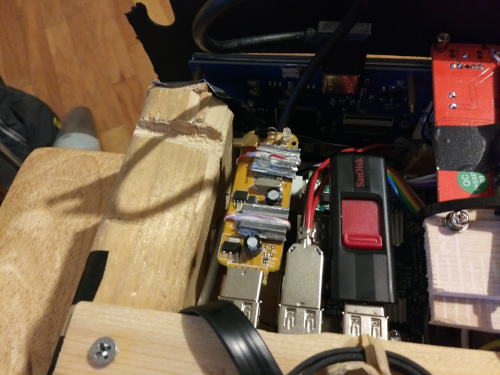
Connect Raspberry Pi to Amplifier and Harness:
Connecting all the hardware is pretty straight forward. You take a look at the next section on building the actual frame that will
hold all the parts and will be bolted to the car where the stereo was. This way you have an idea of how long a wire should be when you go to buy one
or make one. There's a beautiful diagram below showing how I plugged things in. My truck only has two speaker, so that's all that is shown and the
amplifier has only two speaker outputs. If you have more speakers, of course you can get an amplifier with more outputs or simply wire two speakers to
each output to get four, but that's probably not as good. The amplifier I purchased had a choice of two audio inputs, a normal headphone jack or a
three pin plug. I soldered the audio wire to where the three pins attach to the board. The other end of the audio is from the headphone jack of the
Raspberry Pi. The harness is the same kind of harness you would get if you wanted to change your stereo to an aftermarket stereo like a Sony or Pioneer.
Usually you have to get one for you make and model vehicle and then connect it to one that came with the stereo. It will plug into the same harness the
original stereo plugged into. There are only the speaker wires, two for each speaker, and two power wires we are interested in. The rest are not needed,
like the constant 12V power and antennae for example. The 12V positive and ground wires plug into the amplifier and the car adapter. You're gonna want
to smash the car adapter open and solder the wires directly to the board for a good connection. I used a hammer and gently tapped it a bunch of times
until it broke open. The USB hub should have a USB data wire that plugs into the Raspberry Pi and a independent power USB that plugs into the car
adapter. I converted a USB hub that was powered from the same USB wire as the data. I unsoldered the power wires and soldered on a new USB wire. This
is to split the power consumption of all the devices to the two USB ports of the car adapter. If you need an extra USB port for something, you could
remove the WIFI since that wont really be needed except for when problems arise. The USB extension is to extend the port to the front face of the stereo.
On my touchscreen, the touch input and the power came from the GPIO of the Raspberry Pi. On new screens, they come from the USB instead, which can
probably be plugged into the Raspberry Pi.
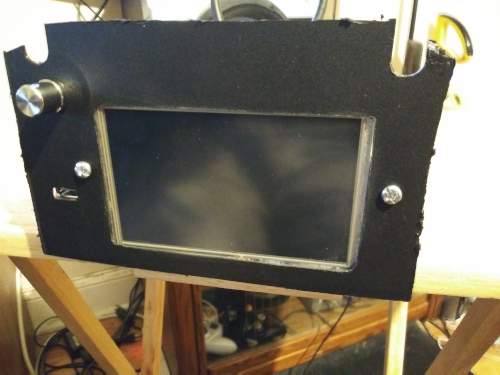
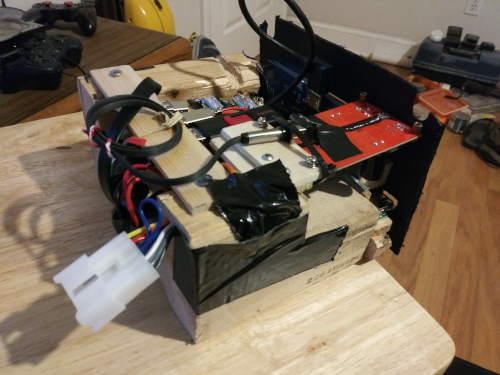
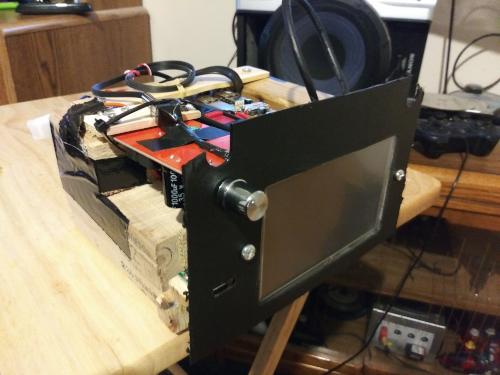
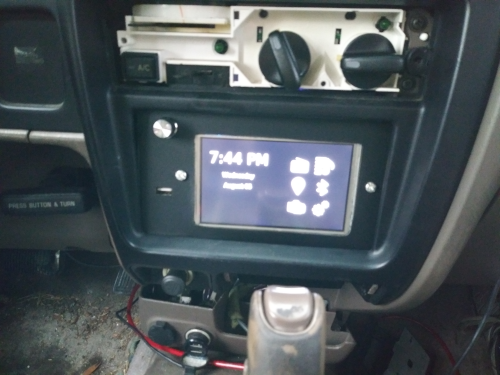
Make a Frame and Install:
The frame of the stereo is easy to build until you get to aligning the front screen so it's flush with the surrounding dash and getting
the holes drilled into the right places. Some vehicles might not have a "normal" stereo that fits the "double din" standard. Those might need an installation
kit for the specific make and model vehicle. On my Toyota truck, there was a bracket on each side of the stereo which I simply unbolted from the old
stereo and bolted on to the new one and then the brackets attach to the car. I made the frame out of spare wood that was lying around. I made mine a
little smaller than the dimensions of the "double din" standard, which is fine as long as the front face is the right width and height and the stereo
can be bolted into the old stereo's location. The Dimensions for the "double din" standard are for a stereo to be seven inches wide, four inches tall,
and around 6 inches deep or so. I made my stereo a little shorter and thinner except the front face. I'm using washers where the stereo is too thin. The
face is just an old plastic DVD box I had lying around. Cutting holes in the correct sizes and places is difficult and I suggest using paper or cardboard
as rough drafts and to help line up everything. I used the Drimmel tool to make the cuts.
I happened to have the original stereo that came with the truck, which I removed years ago, and was able use that for getting
measurements. Try not to make the stereo too deep, like past six inches. Many times there is just enough room for whatever stereo the car came with.
When placing the individual parts in the frame, keep them relatively far apart from each other because some of them can get pretty hot. You might want
to put heatsinks on the Raspberry Pi's processor and on the SDR-RTL dongle's chip. My SDR-RTL dongle will get very hot fast and eventually stop
producing output without any errors. After adding a heatsink to the little chip, it extended the time it took to overheat. I might end up getting a more
expensive one to replace it later on, but for now I think it'll work for trips under an hour long.
Don't forget, there's always a bunch of videos on Youtube about installing stereos in cars. More than likely there is one or more
for your vehicle. They usually can tell you how to take apart the dash and where all the screws are hiding that hold it together.
|