Arduino Laser Turret
Entertain cats forever!
Make a laser turret for your cat to enjoy with an Arduino, a couple of servos, and a laser. This is a very easy project for anyone who is just getting started with Arduino or anyone who is stuck in their house with a cat during a quarantine. This project can work with with any Arduino and could be easily modified to work with ESP8266 and ESP32 as well. The code provided below randomly picks angles and moves the laser to them quickly, but not too quick for the cat. It can be modified to draw simple pictures too, with a bit more programming. |
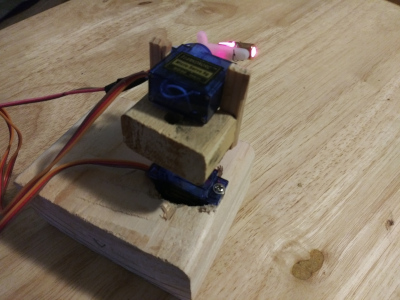
Hardware setup:For this project, your going to need an arduino of some kind, 2 small servos (I'm using SG90 servos, 180 degree turn radius) and a laser. Besides the electronics, you will need a platform of of some sort as a base, some screws or zip ties to hold everything in place, extra wires, and a breadboard to help connect all the wires. For this particular example, I'm using an Arduino nano, two SG90 servos, and a cheap 5 volt laser pointer. I used small block of wood for the base of the turret, and attached the first servo to that. The first servo will rotate the turret left to right. I attached a small and thin piece of wood to the first servo's rotating part, then attached the second servo to that. So now the first servo rotates the second. I then, attached the laser to the second servo which will move the laser up and down. I used screws to attach the servos to the wood and a twist tie to attach the laser to the second servo. Wiring it up is simple. The two servos have three wires: 5volts in, Ground, and the last wire sends the signal from the Arduino. The laser just has two: 5volts in and ground. You're going to want a breadboard to make things easier to connect. Connect the two servo's 5volt pin to the the Arduino's 5volt pin and the servo's ground pins should connect to the ground pin on the Arduino. Now we connect the first(bottom) servo's signal wire to the Arduino's pin 09 and the second(top) servo's signal wire to the Arduino's pin 10. Now we got just the laser left to hook up. The ground wire on the laser connects to the ground on the Arduino and the 5volt on the laser connects to pin 06 on the Arduino. That's it for the wires. You might want a breadboard to connect multiple wires to one pin. If you want to make things permanent, you can solder everything together and get rid of the breadboard. Also the laser wont be getting the full 5 volts with the way we are doing things, but it will still be bright. |
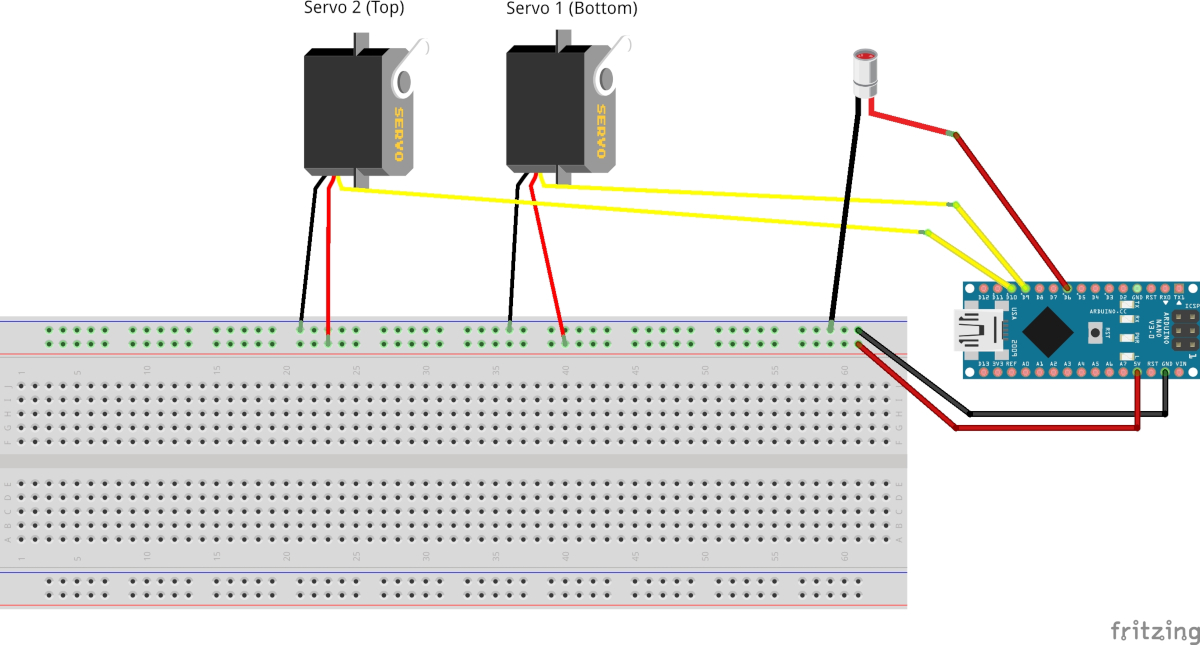
Wiring for Arduino Nano |
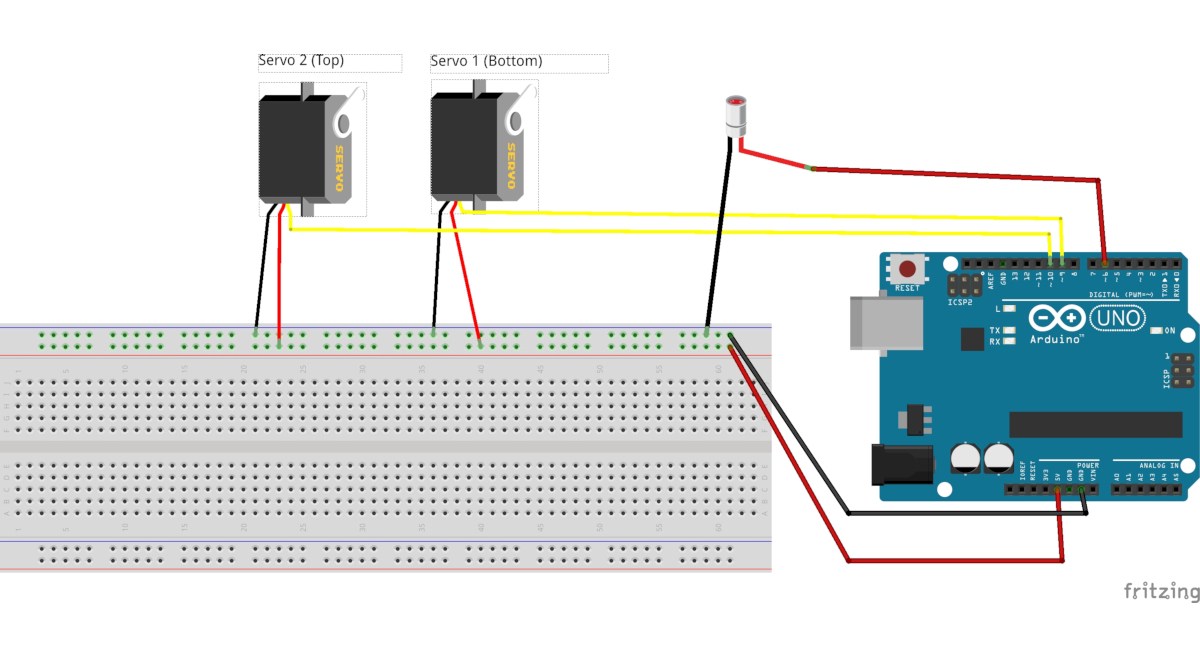
Wiring for Arduino Uno |
|---|
Software code:#include <Servo.h> int servo1Pin = 9; // bottom int servo2Pin = 10; // top int laserPin = 6; Servo servo1; Servo servo2; int servo1Angle = 90; // set servos to half way (if your int servo2Angle = 90; // servos are the 180 degree kind) int servo1NewAngle = 135; int servo2NewAngle = 135; void setup() { Serial.begin(9600); servo1.attach(servo1Pin); servo2.attach(servo2Pin); pinMode(laserPin, OUTPUT); // start random generator using analog // noise from unconnected pin randomSeed(analogRead(0)); } void loop() { //LASER ON! PEW PEW PEW digitalWrite(laserPin, 1); //BOTTOM SERVO -- 0 is right 180 is left //this may be reversed for some setups if (servo1NewAngle == servo1Angle){ servo1NewAngle = (int)random(85, 95); } else if (servo1NewAngle <= 85){ servo1NewAngle = (int)random(85, 95); } else if (servo1NewAngle >= 95){ servo1NewAngle = (int)random(85, 95); } else if (servo1NewAngle > servo1Angle){ servo1Angle++; } else { servo1Angle--; } //TOP SERVO -- 0 is up 180 is down //this may be reversed for some setups if (servo2NewAngle == servo2Angle){ servo2NewAngle = (int)random(65, 70); } else if (servo2NewAngle <= 65){ servo2NewAngle = (int)random(65, 70); } else if (servo2NewAngle >= 70){ servo2NewAngle = (int)random(65, 70); } else if (servo2NewAngle > servo2Angle){ servo2Angle++; } else { servo2Angle--; } servo1.write(servo1Angle); servo2.write(servo2Angle); //this delay determines how fast it //moves from point to point delay(750); } |

Parts you'll need: |